The Forex Trading Dream Machine
Back Ground
Sometime back, we made traders aware of an indicator called the Spaghetti Indicator. What a great indicator! It shows the most overbought Currency in the whole market and the most oversold currency in the whole market. Naturally it makes sense to trade these 2 currencies against each other as a trader would have a 200% chance of getting the direction right as these extremes are often unsustainable.
The problem is that this was an indicator and the trader would have to watch the indicator and trade opportunities manually.


Automation of this great concept
After considerable positive feedback from many of our clients using the Spaghetti indicator we have decided to turn this indicator into a trade-able Robot or expert advisor. This has considerable advantages as traders no longer need to watch the market anymore. Testing can also be done to determine the best entry and exit signals for every timeframe.
So what does this EA do?
It monitors, aggregates and averages RSI readings of all the currencies traded in the Forex Market. When a currency, on average, is highly overbought or oversold compared to ALL other currencies then that is very significant as that is an unusual and unsustainable status to be in. So it makes sense to trade the most highly overbought currency against the most highly oversold currency.
It also make sense to exit when those 2 currencies come back to normal or reach a predetermined profit goal
View this video for an overview of the Forex Dream Machine

THE IMPORTANT STUFF:
How efficient is this EA at making money?

Looking at the back testing results of this EA, shows this EA favours the currency crosses with high volatility. Testing has shown that the best results come from the 4 hour and 1 hour time frames. The main drivers of profitability are the RSI settings and the Difference setting. The most efficient RSI setting appear to be 4 and 6. The most efficient Difference settings are 50 and 60.
See the Dream Machine trading
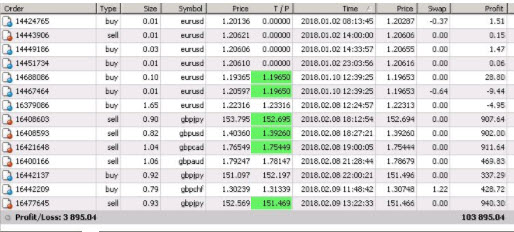
The above video is a open price version to show the trading as it happens. Below are the tick based results over a past period tested. Notice the low account required due to low drawdowns and an 80% success rate. Clearly, this EA also has account doubling potential as $500 was taken to $1800 in 6 months trading 1 lot per trade in this example.


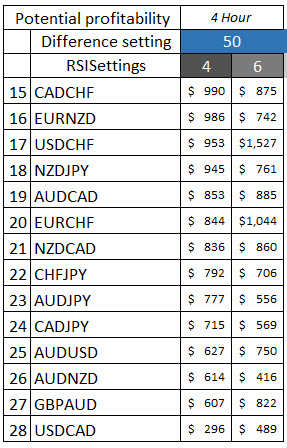
This is not an easy EA to back test as most testers only allow your to test one currency cross at a time whereas the Forex Dream Machine trades the whole market at the same time. To help you get an idea of the potential profitability of this EA we have back tested each of the possible 28 currency crosses individually using the same major settings: Timeframe - 4 hour, RSI settings 4 and 6, Difference setting of 50. The 4 hour timeframe and these settings have proved to be the most efficient results overall.
Please use the results on the left as a mere guide as to the highest potential returns achievable. Results can vary from what is shown.
They represent the results which were achieved when the aggressive settings were used.
The results are based on past periods.
The EA control Panel - How you drive this Robot
EA Settings
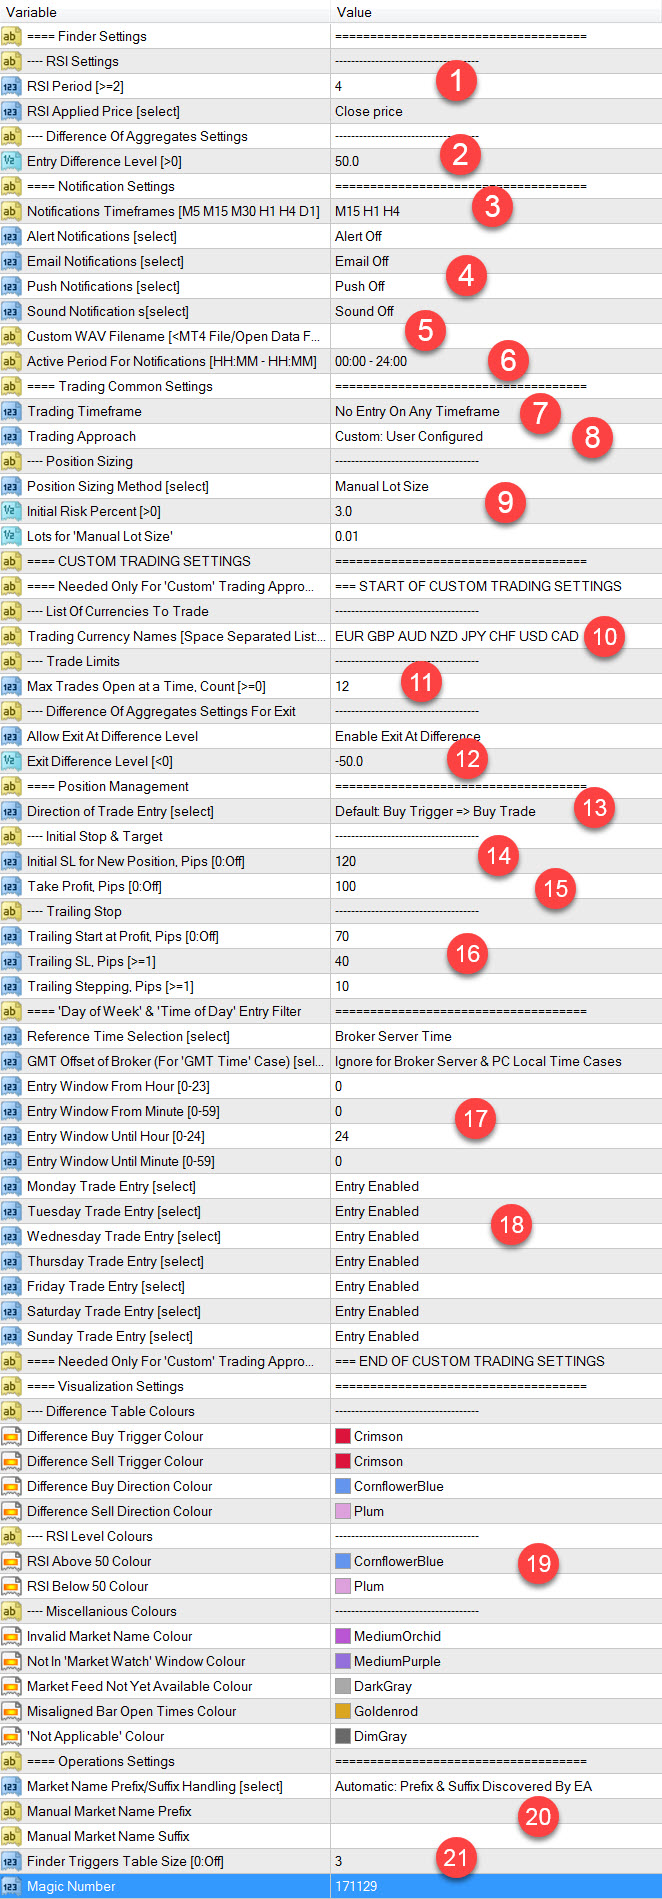
What is nice about this EA is that it is relatively simple and once setup you do not need to do much. Below is an overview of the inputs. For a more detailed explanation of the input please consult the User Manual.
- Enter the period of the RSI you want to use. 4 or 5 is normally good. Higher than 5 you will get less transactions and lower than 4 you may get too many. This setting applies to both the Finder and Trader functions.
- The entry difference between the most overbought currency and most oversold currency can be entered. 50 to 70 is normally good. Higher than 70 will result in fewer transaction but potentially higher success rates. See the results on this page for results recorded for the various currency crosses
- You can select which timeframes you want to use when using the Finder function.
- You can select any of the 4 types of alarms or notifications you will get. It might take some time to get the balance between too many alarms and too few alarms.
- You can even use your own imported sounds using this setting
- Use this setting to identify the times of the day you want to receive alarms. This is intended to give you time to sleep peacefully.
- This is a trading setting where you can select the timeframe you want to trade. IT IS A DROPDOWN MENU with 3 choices. "No Entry On Any Timeframe" turns the trading function off. Then select one of the 1 hour or 4 hour time frames. The other timeframes are not as robust or profitable but can be traded when using the "Custom: User Configured" setting in the next setting.
- Select your trading approach. THIS IS A DROPDOWN MENU. When selecting the "Custom: User Configured" setting you can use you own settings provided in the next few settings. If you select the Aggressive, Balanced or Conservative setting hard-coded setting will be used.
- You can select which Position Sizing approach to use. It is Suggested that you use manual at 0.01 to start with.
- Select the currencies you want to trade. Please take the guidance on the account size for the the number of currencies on this page into account.
- If you need to restrict the number of open deals you want to have due to your accounts size or to minimise risk use this setting.
- One of the exits is that when currencies return from their overbought or oversold states they will go into a state where thy reverse their roles. When this happens you can exit when this happens using this setting. Please bear in mind there are many other exit options.
- The direction of trade can be changed if you wish (only recommended in a very strongly trending market)
- Your stop loss in pips can be entered here
- Your target in pips can be entered here
- You can also exit using a Trailing stop. Enter the trailing stop details here.
- For lower timeframes it is best to specify a time of day to open new trades.
- You can also specify the days you want to trade
- You can change the colors used on your finder tables on your charts
- If your broker uses a currency cross suffix or prefix enter it here e.g. EURUSDecn - enter the ecn.
- Use this setting to set the number of trigger you want to see in the Trigger Finder Table.
Use a different magic number for every different set of setting to manage your EA properly
If there are no set files how do I use the hard-coded settings?
STEP 1: Decide which timeframe you want to trade from the drop down menu shown on the right
STEP 2: select the trading approach you want to foll from the drop-down menu as shown on the right
The EA will automatically match the timeframe you selected with the trading approach and load the settings into the Dream Maker Trader
PLEASE NOTE: When selecting the hard Coded (preset) options you do not need to worry about the other settings. Changing the input settings will not change the results as all the settings are hard coded ( details of these settings are available on the forum)

Trading timeframe dropdown menu

Trading approach dropdown menu
Please note that the hard-coded settings are provided to you to help you learn the Dream Machine. They are not a guarantee of EA success. They are provided to give you a quick start to learn to trade the EA. As suggested on our marketing page you should trade them on a demo account for 2 to 3 weeks to see what results you get and then decide whether you need to make changes to the settings. Remember there is no EA that will make gains every day, or every week or every month consistently. EA results depend of the market conditions when you start trading them. Results may vary from what is shown on this website.
Is The EA Easy to load and manage ?

Setting up is easy:
We supply you with 6 hard codes setting (see the settings part of this page) 3 for the major timeframes each ( 4 Hour and 1 Hour). These are to get you started.
The 3 files are made up of
- Aggressive settings,
- Balanced settings and
- Conservative settings.
(As easy as A, B,C)
So activate your EA, Select your settings and YOU ARE READY TO GO.
We suggest you demo trade for 2 weeks to make sure you are happy with the EA functionality.
Watch these videos for more information
about the DREAM MACHINE?
The Forex Dream Machine MT4 Expert Advisor. Trading strong against weak currencies. An Introduction
The Forex Dream Machine MT4 EA. The Forex chart RSI readings information display created by the EA
What account size should I be using?
Account size guide assuming a micro account (0.01) lot sizing. Once you have tested the EA for a few weeks you can refine these guides.
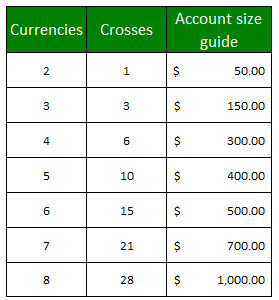
When considering the account size one should use when trading EAs there are many factors to consider:- The number of currencies traded, the timeframe traded, broker margin requirements, potential drawdowns, number of open deals and lot sizing you are going to use.
To make it easy the table on the left shows the account size you should start out with when using a micro account (0.01 lot sizing).
The best test you can do is to demo trade all 8 currencies for a month to see how much of your demo account balance was used to finance drawdowns and margin requirements
Currency refers to a major currencies i.e. EUR . A cross is what is traded i.e. EURUSD

It should be easily used by US traders as the number of open trades is controllable and the likelihood of hedging and FIFO problems remote.
What support can you expect?

Please click on YouTube to view the video below in full size
FREE Email technical and EA trading support for owners of our EAs
Technical and installation support
All Expert4x EA are fully supported by EAFactory from a technical perspective.
All upgrades are free and a comprehensive user guide is available. If you would like to please click the link below to download it before you purchase.
Recent Client feedback: "Over the past 8 years I have purchased -- no exaggeration -- over 100 EA's and as such have dealt with scores of support staff re: these EA's. I just want to express my appreciation to your support group for the timely & detailed explanations for my specific issues. Typically tech support leaves quite a bit to be desired but you guys get A+ ratings for your efforts!"
Trading and Training
Expert4x supplies the trading and training support. Please make use of the contact us facilities on this website if you have any questions. Please note that we supply all of the training and videos for this EA on this page so that you can see how the EA works and how you will use it BEFORE you purchase it. Use this link to the Forum: Forum

How can you get a great start with this EA?
JUST TO REPEAT:
This is an easy EA to trade but you need to test it for a week or 2.
Step 1: Open a demo account with a balance of at least $10 000.
Step 2: After you have installed the Forex Dream Machine go the the setting called "Trading Timeframe". This is a drop-down menu. Select either the 1 hour or 4 hour timeframe ( The 1 hour produces more transactions)
Step 3: Go to the "Trading approach setting". It is also a drop-down menu. Select what type of approach you want to use - aggressive, balanced or conservative. Aggressive produces the most transactions.
Step 4: Activate the Autotrading button.
That's it - you are trading !!

Depending on market conditions it may take a few days for your first deals to happen. The 1 hour/aggressive produces the most transactions and the 4 hour/conservative combination produces to lowest number of transaction. Aggressive refers to high risk/high return settings. Balanced refers to balanced risk/reasonable returns settings and Conservative to low risk/ low return settings. It might be a good idea to link your account to FXblue Live - this will enable you to tell which currencies are best. So after 2 weeks of testing you will be able to drop the under performing currencies and focus on the profitable ones. To be able to compare different currency trading results it is advisable to use fixed lots.
Also you could open a second or third demo account and test a bigger variety of options like 4 hour/aggressive or 1 hour/conservative or 1 hour / aggressive conbinations. That way you will find currency and setting combinations that work best for you. Although you can use this EA as many times as you like on any 2 computers please bear in mind it does use more resources than most EAs so you need to monitor that aspect.
If you are an EA wiz you don't need hard coded settings - merely select the "Custom: User configured" user trading approach and do your own thing.
Important consideration. This EA effectively is trading and monitoring 28 currency crosses at the same time. It therefore uses considerably more computer resources than the average EA ( 10 to 20 time as much). Please bear this in mind when using VPS services that are sometimes very under resourced.
But Wait !! - What do our Clients say?
(Click on the persons name to go to the actual source of the comment)
Bought a number of your products. This seems the best by far. Up and running in ten minutes. Seven closed trades six positive. Love it.
Mike
YouTube Comment
Just set up the EA - and Alex is right - about 10 minutes max!
Doug
YouTube Comment
Positive results keep coming in. Excellent robot so far ... I put it on a live account using 0.01 entries .. lets see how it goes
FxTiger
Dream Machine Forum
Never saw anything easier than the setup for this Dream Machine EA
Marius
Incredible, took minutes... Thanks Alex and congrats
Dream Machine Forum
Please note that the hard-coded settings are provided to you to help you learn the Dream Machine. They are not a guarantee of EA success. They are provided to give you a quick start to learn to trade the EA. As suggested you should trade them on a demo account for 2 to 3 weeks to see what results you get and then decide whether you need to make changes to the settings.
Remember there is no EA that will make gains every day, or every week or every month consistently. EA results depend of the market conditions when you start trading them. Forex trading is very risky and after your purchase you assume all the risks of Forex trading.
Any details mentioned on this page do not represent a promise of success, a guarantee on income or anything of that nature. NOBODY can predict the future and the details shown and the settings described are based on history. History is not guaranteed to repeat.
The EA performs technically as described on this page and that is what you are buying. It is your responsibility as a Forex trader to manage the EA on an ongoing basis.
IMPORTANT


The DreamMachine now comes with an additional Plug-n-Play version that only requires 2 setting inputs - watch this video for more details.
There are 4 versions of The Dream Machine: MT4 and MT5 versions; as well as Plug n Play versions for MT4 and MT5 platforms.
Watch all the videos created for DreamMachine Traders :
DreamMachine Videos
New to Forex robot trading?
If you are new to Forex trading and Forex Robot trading then please make use of these FREE resources.
The best beginner course in the Forex industry: FOREX UNIVERSITY
A 6 module downloadable PDF course covering how to find ENTRIES, TURNING POINTS, EXITS, TIMES TO TRADE, MANAGE MONEY and WHERE TO PLACE STOPS : Simple-N-Easy Forex Series
These will give you the very best start to trading the Forex market
For information about trading Forex robots please watch the videos below.

Tips on getting the best out of the Forex Dream Machine
1. Do not trade on a live account until you have experienced positive results on a demo account over a 2 to 4-week period (Don’t be in a hurry).
2. Use position sizing of 0.01 for every currency for every $1 000 in your demo account.
3. Test as many currencies and timeframes as your computer resources allow.
4. Know the function of each setting as described in the user manual.
5. Study this marketing page and watch all the videos provided.
6. Learn how to download testing set files (Video on this page).
7. Learn how to calibrate and optimise the EA for your broker account (Video on this page)
8. Make sure you know the basics of Forex trading by doing the free courses on this page.
9. Do not trade on a live account until you have experienced positive results on a demo account over a 2 to 4-week period (Don’t be in a hurry).
Limited Capital ?
Learn how you can trade with limited funds using 1c accounts. These accounts treat cents as dollars. $100 become a $10 000 account. This allows you to trade all Forex robots with relatively small amounts capital.
We are currently running a special promotion where you can buy most of our trading Expert Advisors for 82% discount.
Click here >> 82% off <<
How can get your hands of this EA?

When you purchase this Trading Tool, the items below become freely downloadable as FREE Bonuses from the product download EAFactory website. Click on the button to see more details >>
Note to US Traders using US Brokers: Our Robots do not work on US Broker accounts due to hedging and FIFO restrictions. Most US robot traders use off shore broker accounts.
IMPORTANT: Before you purchase, please read our "Sales Agreement" and "Risk Disclaimer" at the bottom of the page. By Clicking on any of the PayPal Buttons, you are agreeing to the "Sales Agreement".
New Clients - Purchase for USD $278.00
Please use the PayPal button on the right.
Existing EA clients - Purchase for $139 at 50% discount
Existing clients purchase the EA for a 50% discount by logging into their EAFactory account and using the PayPal buttons on the EAFactory website .
YOUTUBE Subscribers Purchase for $139 - 50% discount
Crypto Currency Payments
We also accept Bitcoin. Crypto prices are the same as PayPal and no further discounts apply. Please contact us for this type of payment.
PLEASE NOTE:- We do not have Telegram, WhatsApp or any other messaging app. We have 2 Forums which are used for discussion and messaging: Free Expert4x Forum and Premium Expert4x Forum


